Go to Blogger edit html and find these sentences.Now replace these sentences with your own descriptions.This theme is Bloggerized by Lasantha Bandara - Premiumbloggertemplates.com.
Go to Blogger edit html and find these sentences.Now replace these sentences with your own descriptions.This theme is Bloggerized by Lasantha Bandara - Premiumbloggertemplates.com.
Go to Blogger edit html and find these sentences.Now replace these sentences with your own descriptions.This theme is Bloggerized by Lasantha Bandara - Premiumbloggertemplates.com.
Go to Blogger edit html and find these sentences.Now replace these sentences with your own descriptions.This theme is Bloggerized by Lasantha Bandara - Premiumbloggertemplates.com.
Go to Blogger edit html and find these sentences.Now replace these sentences with your own descriptions.This theme is Bloggerized by Lasantha Bandara - Premiumbloggertemplates.com.
Cave app is a latest app for Movie review and It is the official app of Cave website.Movie will be updated on time.The Movie Guide for Android : The fastest, easiest way to find and discover movies, actors and shows on your device. Includes The Movie Database (TMDb), IMDb, Metacritic, and Rotten Tomatoes ratings and reviews!
Cave - official movie App 2020 is a complete movies app which allows you to HD movies free without any registration.No need to stream online again and again and waste your data by watch movies online . Search and browse movies, watch trailers, IMDb ratings, general details, casting info, and download a massive collection of movies. You can also search and browse movies via many categories like - ratings, quality, genre, etc.
On Our Cave official Movies App You Can:
Bollywood Hollywood dubbed Dual audio South indian dubbed
Cave - Free Cave official app 2020 is one of the best movie apps currently on the Internet. App is especially design for movie review And it has nice interface with dark theme . That's make more pretty
MX Player is an Indian mobile video player app and an Indian over-the-top media streaming service, created by J2 Interactive now known as MX Media & Entertainment and owned by Times Internet, the digital media division of Times Group.
MXPLAYER FEATURE:
a) HARDWARE ACCELERATION - Hardware acceleration can be applied to more videos with the help of new HW+ decoder.
b) MULTI-CORE DECODING - MX Player is the first Android video player which supports multi-core decoding. Test result proved that multi-core device's performance is up to 70% better than single-core devices.
c) PINCH TO ZOOM, ZOOM AND PAN - Easily zoom in and out by pinching and swiping across the screen. Zoom and Pan is also available by option.
d) SUBTITLE GESTURES - Scroll forward/backward to move to next/previous text, Up/down to move text up and down, Zoom in/out to change text size.
e) MX FILE SHARING - Fast transfer files without mobile data usage. Share Music, Share Video, Share Files.
f) KIDS LOCK - Keep your kids entertained without having to worry that they can make calls or touch other apps.
Unlike GUI-based programs we use mostly, command prompt is an utility for text commands only. You have to input the commands to tell the computer what's to do. This method to bypass Windows 10 password requires you to boot the locked computer from a Windows 10 installation DVD. If you don't have one, you can download the ISO file from Microsoft's website and burn it to a USB or DVD .Once you have the disk ready, follow the steps below to bypass Windows 10 password using command prompt utility.
Step 1: Insert the Windows 10 disk and boot your computer from it. To do this, you will need to boot up normally, and then press the F2 key or other special key to access the boot menu. Here, you can change the boot priority so the computer boots from the disk instead of the current Windows 10 installation files.
Step 2: Once it boots up, click Shift+F10 to open Command Prompt. Execute the following two commands one after the other:
Step 3: The first one creates a backup of the utilman.exe file, while the second replaces the original utilman.exe with cmd.exe. You have to do this in order to carry out the next step.
Step 4: Remove the installation disk and reboot your PC. On the login page, click on the icon for Utility Manager. Since you replaced it with the cmd file, Command Prompt should open up. Ignore any error message at this point. Run the following command to reset the password for the locked user account.
net user user_name new_password
Step 5: Remember to replace and in the command above before pressing Enter. Your password has now been reset, and you can login normally into the previously locked account. You also need to remember to put back the utilman.exe file to its original location. This method works with local accounts, but if you're using a Microsoft account, then you have to try another method.
If you’re running Windows 10 on your computer or laptop and feeling very irritated because of its sluggish performance? Don’t worry! In this article, you will check out some useful tricks and workarounds that will definitely help you to fix slow running Windows 10 PC/Laptop and will boost the overall speed of your system to its optimal performance.
Windows Computer gets slow by the time due to lots of junk files, different types of software installation, registry entries, background task, and scheduled tasks.
Once you install new software it does create new files into C drive (by default), registry entries, services and many other tasks which may be running in the background eating RAM and CPU. Having tons of software installed into PC also makes your Windows 10 Slow, in this article, you will be guided to adjust Windows 10 settings for better performance.
Apart from adjusting the settings in slow windows 10 you will also get to know different other ways to fix slow computer.
After making the following changes on your Windows 10 PC, you will notice the change and enjoy the speed of your owned PC running Windows 10 into it. So without further delay, why don’t you start checking these tips to fix slow running windows 10.
How to Fix Slow Running Windows 10 Manually
There are some PC tuneup software are available but they do minimal work and some ask you to shed cash on their apps, these tuneup software can remove the junk from your computer, can delete unused registry entries, or help you to remove the leftover of uninstalled programs.
But software cannot adjust the settings of your Windows 10, you have to manually change these setting to make Windows 10 faster again.
Here are the settings you need to adjust.
1. Disable Animations and Effects
Improvisation, making things more interesting and attractive lead to more energy consumption. Here, Windows has improved a lot in terms of attractiveness then simultaneously, it uses more power, extra RAM space and slows down the functionality.
Follow the mentioned steps to disable the animations and effects to improve the performance of your PC.
1. Launch RUN dialog box using WIN + R keyboard shortcut. Type sysdm.cpl and click OK.
2. The system properties window will pop up. Here switch to the Advanced tab, and then click on the Settings button which you can see under Performance section.
A new window will appear on which you can choose the settings you want to use for the appearance and performance of Windows 10 on this computer
3. In this window, click on Custom radio button and uncheck all the settings except the second one “Animate windows when minimizing and maximizing” (shown in the following image). Click on Apply button to make changes.
If you want to improve windows 10 performance by keeping the better appearance then you can uncheck the following options.
1. Animate controls and elements inside windows.
2. Animate windows when minimizing and maximizing.
3. Animations in the taskbar.
4. Fade or slide menus into view.
5. Fade or slideToolTips into view.
6. Fade out menu items after clicking.
7. Show shadows under windows.
8. Show translucent selection rectangle.
9. Slide open combo boxes.
10. Smooth scroll list boxes.
11. Use drop shadows for icon labels on the desktop.
Once you uncheck the given options then you will definitely notice some improvements in the performance.
Remove Unwanted Startup programs
Did you know there are many unnecessary programs which start up with windows and slow down the system performance?
Yes, there are such programs but no need to worry about it as they can be disabled. Disabling such programs is a very easy task with the below steps.
1. Open Task Manager by right-clicking on the Start button and from the options click on Task Manager to launch it.
Or use the Ctrl+Shift+Esc keyboard shortcut altogether to launch it quickly
2. Click on the Startup tab and choose unwanted startup programs from the list and hit the disable button to disable these startup programs.
3. Now, you need to restart your computer to apply the changes. (You can restart later after doing everything mentioned in this article.)
You can disable almost every startup programs except the Antivirus, it won’t cause any trouble. You will definitely notice the change in the processing speed of your Windows 10 PC.
Disable unnecessary features from folder option
You will find this idea very useful and fruitful when once you try this on your system. With my experience, I would advise you to follow this step which will lead to speed up the processing of files and folders.
1. Launch the File Explorer -> This PC and click on the “View” tab which you will find in Ribbon.
2. It will launch the Folder Options window. Here you need to click on the Options which is listed at the end.
Alternatively, you can also search Folder Options in the Start menu search bar and when you see it in search click to launch it quickly.
3. It will launch the another File Explorer Options window. You need to switch to “View” tab in this window and untick the following options:
Display file size information in folder tips.
Hide empty drives.
Hide extensions for known file types.
Hide folder merge conflicts.
Show encrypted or compressed NTFS files in color.
Show pop-up description for folder and desktop items.
4. Once done, click on Apply button and then OK.
Disable Transparency on Taskbar, Action Center, and Start Menu
If you love performance more than looks then should try this option. Microsoft introduces the transparency feature in Windows 7 and improvises for Windows 10 to maintain the beauty factor. You can disable this by using simple steps mentioned below. Try this out:
1. Launch the Settings apps from the Start Menu of Windows 10. Or you can press WIN + I shortcut keys to quickly launch the Settings app window.
2. After that click on the Personalization and then click on the Colors options on the left panel. On the right pane, look for
On the right pane, look for “Make Start, taskbar, and action center transparent” this setting and turn it off.
Vacant Memory in Hard Drive using Disk Cleanup Utility
This is one of the useful information which every Windows 10 users must know. The operating system also uses some part of system hard drive to keep the performance balance.
In this case, the system memory will burst out, which in return cause issues. So it is highly advisable to maintain at least ten percent of the total space free to maintain the performance.
If your windows 10 running slow then remove data which is not required, make a backup of movies, photos, and videos on an external drive.
To remove temporary and other unnecessary files, make a habit of using Disk Cleanup utility.
Search for Disk Cleanup from the Start Menu. Click on the Disk Cleanup utility in search results to launch it.
A little pop-up will appear asking you to select the drive from which you want to clear unnecessary and temporary files
Click OK and it will start calculating how much space you can free.
Another window will come up. Here you need to click OK.
In case, you want to see some advanced options, then you can click on “Clean Up System files” button -> Select the files which you want to clear and click OK.
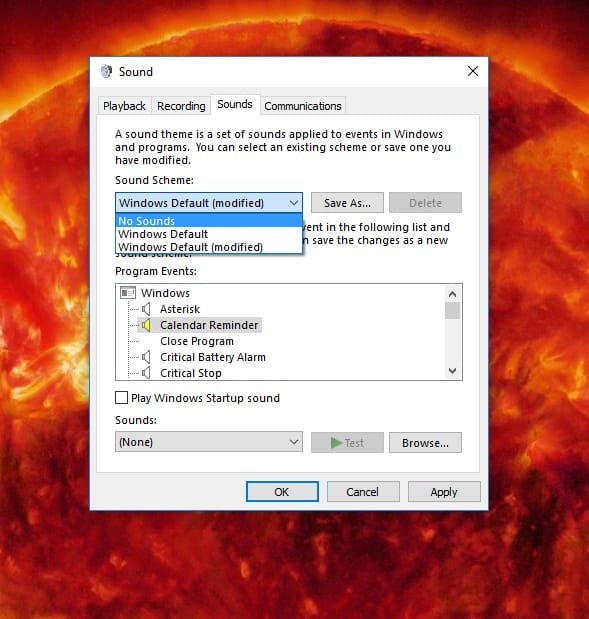
Disable Sound Notifications
I love the notification sound of my laptop when it reminds me of the low battery power but I do not like it much when it is not required such as while plugging or unplugging the pen drive. You can disable all or some of these sound notifications.
1. In the Start menu search bar, type Sounds and from the search results click on “Change system sound” to open it.
Alternatively, Make a right click on the Sound icon in the notification area at the bottom-right side of the screen and from the options click on Sounds to launch the system sounds setting window.
2. In the Sound window, choose None from sounds dropdown list after selecting the desired program which you want to disable.
In case, you wish to disable the sounds from all notification then you can also choose No Sounds from Sound Scheme.
Uninstall Unnecessary Modern Apps
You must be aware of the applications installed in your system but, in Windows 10, there are some pre-installed modern apps which keep itself running in the background and hit your system performance. Find few options which can help you in uninstalling the apps.
Actually, there are different ways to uninstall modern apps which are:
Uninstall apps using Start Menu
Uninstall apps using Settings
Uninstall all built-in apps using PowerShell
Uninstall all built-in apps using the latest version of CCleaner
There are different pre-installed apps which you might not be using, you can uninstall those apps in order to save computing resources and some space to fix slow Windows 10.
Here is the list of modern apps which you can uninstall-
3D builder
Alarm & Clock
App connector, App Installer.
Calendar
Mails, Calculator.
Camera, Feedhub.
Office, Skype, Microsoft Solitaire Collection.
Groove Music, Movies & TV.
Maps, Microsoft Solitaire Collection.
Microsoft Wallet, Money, News, Sports, Weather.
Paaint 3D, People, Phone, Photos, Sports.
Sway, Windows holographic, Xbox,
Reduce Windows Startup and Shut Down Time
When you start your Windows computer it does load certain services from Microsoft as well as from third-party software installed into your computer. It may cause slow startup and shutdown of Windows 10.
Also, Windows deploy minimal resources to start your computer as the number of CPU cores to start the Windows. By default, it is set to use only 2 cores of CPU even if you are running an octa-core processor.
To do it press Win + R keys together to open the RUN dialog box. Type in msconfig and hit OK. You will get the System Configuration Window.
Click on the Boot tab and select your operating system. Now click on Advanced options.
Check the box beside Number of processors and select the maximum available cores into your PC.
Also, check the Maximum Memory option and it will automatically select the maximum memory depending on the size of RAM into your computer.
Now go to Services Tab and check the option to Hide all Microsoft services. You will now see the services by third-party software.
Here you can untick the most of the services except antivirus and some programs which need to run at startup.
After making the changes you need to click on Apply then OK. Restart the computer to make changes effective.
Stop Background Data Collection by Configuring Privacy Settings
To make your PC friendlier to you, Operating System collects information regarding you at the backend such as your typing behavior, account information, credentials.
But this is also true that the whole process also affects overall system performance. You can configure the privacy settings in Windows 10 which improves the performance of your system.
Normally, you can manage privacy settings during the time of installation, but in case, you have not done that during the installation, you can still configure privacy settings. Here is what you need to do:
Launch the Settings apps -> Privacy. Here you will find privacy settings for all the components of the Windows 10 operating system. It is up to you which privacy settings you want to disable.
Apart from the above-mentioned tips, there are some other tips which you must follow to improve the overall performance of the Windows 10 PC which are:
Make sure to update the Windows version time to time
Always install the useful and necessary apps and software. Also, uninstall the one which is of no use.
Always use a good antivirus and update it time to time.
Video Help To Fix Slow Problem Windows 10
Hardware Up-gradation
Time passes, we grow and growth is required in every part. Only up-gradation of software and the operating system will not help you in improving the system performance.
The hardware needs to match the requirement of upgraded software. We have the solution to fix such issues by using external RAM modules and Hard Drives. This solution can give your system another few years of life.
This solution can give your system another few years of life. However, we suggest you upgrade the system hardware time to time as well.
To find out your system information. You can simply search “System information” and when the same option appears in the search result click to launch it. Under System summary, you will find out all the details about your system. Also, you will get an idea of what hardware is outdated.
Also, the minimum system requirement for installing Windows 10 according to Microsoft is as follow:
Latest OS: You must be running Windows 7, 8 or 8.1 on your system
Processor: 1 gigahertz (GHz) or faster processor or SoC
RAM: 1 gigabyte (GB) for 32-bit or 2 GB for 64-bit OS.
Hard disk space: 16 GB for 32-bit OS 20 GB for 64-bit OS
Graphics card: DirectX 9 or later with WDDM 1.0 drive
Display: 800×600
So these are some of the tips which you can follow to fix slow running Windows 10 PC. Why don’t you give a try to these tips and let us know which you find useful?
How to Password Protect and Hide a Windows Folder | विंडोज फोल्डर को पासवर्ड प्रोटेक्ट कैसे करें
Take a file or a folder, drag and drop it onto Anvi Folder Locker’s interface, and this application will automatically lock and hide it. If the file is hidden away, people won’t be able to find it. Should they somehow be able to find it, they won’t be able to open it, because it’s locked. So as you can see, Anvi Folder Locker provides an efficient means of keeping others from accessing your stuff.
The system requirements for running Anvi Folder Locker are: Intel dual-core processor, 256MB of RAM, 50MB of free disk space, Windows operating system (any edition from XP onward). Thanks to a simple setup wizard, you will quickly get Anvi Folder Locker up and running on a PC that meets these system requirements.
Access to Anvi Folder Locker’s interface is password protected. The first time you run the application, you will be asked to set a master password (enter a password, confirm the password) and you will be asked to provide an email address (it will be used to send you a reset key, should you forget the master password).
As mentioned above, Anvi Folder Locker will automatically lock and hide whatever file or folder you drag & drop on the interface (alternatively, you can use the Add function instead of drag & drop). Next to each file or folder, there’s a Protection Method dropdown menu that features the following options: unprotect, hide, lock, read only, hide and lock, password. This means that you can hide files without locking them, lock them without hiding them, make them read only, lock and hide them, or password protect them.
You can change the default behavior presented above by going to the Settings menu, the Protection Method section. You will find two dropdown menus; one lets you pick the default behavior for adding new items, the other lets you choose what happens after removing the password.
Anvi Folder Locker integrates with the right click context menu. Right click a file or a folder and you’ll see an option to lock it with Anvi Folder Locker.
Anvi Folder Locker is free software.
Protect your privacy by keeping others from accessing your files and folders. Use Anvi Folder Locker to easily lock and hide files or folders.
Pros
The system requirements for running Anvi Folder Locker are fairly low. Access to Anvi Folder Locker’s interface is password protected. Said interface is easy to navigate. Use Anvi Folder Locker to lock, hide, lock & hide, password protect files as well as folders. Anvi Folder Locker integrates with the right click context menu. Anvi Folder Locker is free software.
Control Android Phone from PC via Internet From Anywhere | पीसी से एंड्रॉइड फोन को नियंत्रित करें
AnyDesk is a remote control application using which anyone can view and control their desktop computers from other desktop computers or from mobile devices like Android smartphones or tablets. AnyDesk is known for their small size applications, for the ease of use and for the fast connectivity.
AnyDesk is available for a number of platforms like Mac OS, Windows, Linux, FreeBSD, Android and iOS. But the mobile apps are basically for controlling the desktop computers running the AnyDesk software. While the AnyDesk software for the desktop computers can both connect to the remote computers to view/control them and act as remote desktop server so that other devices can connect to your desktop computer.
For controlling your Windows PC remotely from an Android smartphone or tablet, you can download and run the AnyDesk application in your PC. The downloaded program does not need to be installed and is less than 2 MB in size. Upon launching AnyDesk in your Windows PC, you will be shown a nine digit number. You have to enter this number in AnyDesk running on other desktop computers or mobile devices.
On your Android smartphone, you can install the AnyDesk app. As you launch the app, it will ask you remote desk address. You should enter the same nine digit number displayed in AnyDesk in your Windows PC and tap on the Connect button.
Back in your Windows PC, you will be shown a notification that a remote device is trying to connect to your PC through AnyDesk. You can select the various permissions you want to grant to the remote computer trying to connect to your Windows PC. The permissions include hearing all the sound being played, control of keyboard & mouse, control of Windows, and use of clipboard. After this click on the Accept button to allow the connection
After a connection is made, AnyDesk will show the Windows PC screen on your Android screen. You can pinch-zoom the screen, use touchscreen to use the mouse, use Android keyboard as your PC keyboard, and listen to all the sound being played on the PC.
AnyDesk does not work through local network like Ethernet or WiFi. For AnyDesk to work, internet connection is a requirement. But AnyDesk uses very high speed servers making the access and control of the remote computers completely lag free.
Here is The Video Help
AnyDesk एक रिमोट कंट्रोल एप्लिकेशन है, जिसके उपयोग से कोई भी अपने डेस्कटॉप कंप्यूटरों को अन्य डेस्कटॉप कंप्यूटरों या एंड्रॉइड स्मार्टफोन या टैबलेट जैसे मोबाइल उपकरणों से देख और नियंत्रित कर सकता है। AnyDesk अपने छोटे आकार के अनुप्रयोगों के लिए उपयोग में आसानी और तेज़ कनेक्टिविटी के लिए जाना जाता है।
AnyDesk मैक ओएस, विंडोज, लिनक्स, फ्रीबीएसडी, एंड्रॉइड और आईओएस जैसे कई प्लेटफार्मों के लिए उपलब्ध है। लेकिन मोबाइल ऐप मूल रूप से AnyDesk सॉफ़्टवेयर चलाने वाले डेस्कटॉप कंप्यूटर को नियंत्रित करने के लिए हैं। जबकि डेस्कटॉप कंप्यूटर के लिए AnyDesk सॉफ़्टवेयर दोनों को देखने / नियंत्रित करने के लिए दूरस्थ कंप्यूटर से कनेक्ट हो सकता है और दूरस्थ डेस्कटॉप सर्वर के रूप में कार्य कर सकता है ताकि अन्य डिवाइस आपके डेस्कटॉप कंप्यूटर से कनेक्ट हो सकें।
एंड्रॉइड स्मार्टफोन या टैबलेट से अपने विंडोज पीसी को दूरस्थ रूप से नियंत्रित करने के लिए, आप अपने पीसी में AnyDesk एप्लिकेशन डाउनलोड और चला सकते हैं। डाउनलोड किए गए प्रोग्राम को स्थापित करने की आवश्यकता नहीं है और आकार में 2 एमबी से कम है। अपने विंडोज पीसी में AnyDesk लॉन्च करने पर, आपको नौ अंकों की संख्या दिखाई जाएगी। आपको अन्य डेस्कटॉप कंप्यूटर या मोबाइल उपकरणों पर चल रहे AnyDesk में इस नंबर को दर्ज करना होगा।
अपने Android स्मार्टफोन पर, आप AnyDesk ऐप इंस्टॉल कर सकते हैं। जैसे ही आप ऐप लॉन्च करते हैं, यह आपसे रिमोट डेस्क का पता पूछेगा। आपको अपने विंडोज पीसी में AnyDesk में प्रदर्शित समान नौ अंकों की संख्या दर्ज करनी होगी और कनेक्ट बटन पर टैप करना होगा।
अपने विंडोज पीसी में वापस, आपको एक सूचना दिखाई जाएगी कि एक दूरस्थ डिवाइस AnyDesk के माध्यम से आपके पीसी से जुड़ने की कोशिश कर रहा है। आप उन विभिन्न अनुमतियों का चयन कर सकते हैं जिन्हें आप अपने विंडोज पीसी से कनेक्ट करने की कोशिश कर रहे रिमोट कंप्यूटर को देना चाहते हैं। अनुमतियों में सभी ध्वनि को सुनना, कीबोर्ड और माउस का नियंत्रण, विंडोज का नियंत्रण और क्लिपबोर्ड का उपयोग शामिल है। इसके बाद कनेक्शन स्वीकार करने के लिए Accept बटन पर क्लिक करें।
कनेक्शन होने के बाद, AnyDesk आपके Android स्क्रीन पर विंडोज पीसी स्क्रीन दिखाएगा। आप स्क्रीन को पिंच-ज़ूम कर सकते हैं, माउस का उपयोग करने के लिए टचस्क्रीन का उपयोग कर सकते हैं, अपने पीसी कीबोर्ड के रूप में एंड्रॉइड कीबोर्ड का उपयोग कर सकते हैं, और पीसी पर बजने वाली सभी ध्वनि को सुन सकते हैं।
AnyDesk ईथरनेट या वाईफाई जैसे स्थानीय नेटवर्क के माध्यम से काम नहीं करता है। AnyDesk काम करने के लिए, इंटरनेट कनेक्शन एक आवश्यकता है। लेकिन AnyDesk बहुत ही उच्च गति सर्वर का उपयोग करता है जो दूरस्थ कंप्यूटरों की पहुंच और नियंत्रण को पूरी तरह से मुक्त बनाता है।


